
Drones are fast becoming one of the most popular travel accessories. You can capture some truly incredible photos and videos with a drone, especially if you’ve got one of the high end 4K quadcopters.
But it can be hard to know where to start, especially if you’ve never even flown a drone before. So here are some top tips for taking great photos and videos.
Top Tips For Taking Stunning Drone Photos
Learn Basic Photography
Drone photography isn’t all that different from normal photography, so it can help to learn the general basics before taking to the skies with your flying camera.
Photography is all about light. If you think about it, light has much greater impact in aerial photography, as your camera is now closer to the most powerful source of natural light – the sun.
The effect of glare, reflections and shadows are therefore magnified. Learning how to manipulate light to your advantage will better equip you to overcome these challenges.
In addition to light, understanding composition techniques such as leading lines, framing and the rule of thirds will also be invaluable in creating balanced, aesthetically pleasing images.
Capitalize on the Golden Hour
You get two chances every day. The Golden Hour refers to the times of day when the natural light is perfect – in the morning it’s the hour after sunrise and again in the evening the hour before sunset. How long these periods actually last, will vary based on time of year and location.
During these times the sun is lowest in the sky, creating soft, diffused light instead of the harsher midday sun. This type of light reduces shadows and highlights, giving the overall image a warm and pleasing glow. There are also usually a lot less people around at these times so that’s definitely a plus.
Location, Location, Location
Do your research and scope out your location beforehand. See what the crowds are like, find a spot for take-off and landing, make note of interesting landmarks and talk to the locals about any hidden gems.
You’ll also want to stay clear of people and private property, so make sure the location is safe and legal to fly over.
Create a Flight Plan
Plot your flight course for safety and efficiency. You don’t want to waste precious battery power figuring out where to go and what to shoot. This is where your photography knowledge, time of day and location considerations come together.
By planning a route to fly, you’ll also be able to think about what you want to capture in advance.
Take Control
While automatic flight modes are great when you’re getting started, you’ll want to take the reins and fly manually as soon as you’re able.
The finer more precise control and handling of your craft, will allow you to create images exactly as you envisioned. With automatic modes you’re trading control for ease – don’t be lazy, master your machine.
This goes for camera settings too, especially shutter speed. Keep in mind that with drone photography your camera is not stationary and where there’s movement there’s the risk of introducing blur. Blur can be a creative tool, but it should be controlled. In most cases, you’ll want to use faster shutter speeds to avoid blur and get sharp images. So shoot manually if your camera allows. I know it sounds like a lot to do at once, but practice is the key.
Remember You Are Creating Art
The purpose of art is to evoke emotion. You want your images to make people pause and really take it in. You want them to feel something. Make your captures tell a story – about your journey, the culture of your destination or even just a moment. You are an artist and your drone is your paintbrush.
Use the Tools Available
The tools we’re talking about here, are your accessories. As with standard photography, basic accessories like lens filters and hoods can really enhance your images. Neutral density and polarizing filters will play a crucial role in controlling exposure and tonal quality, while hoods can prevent glare and propeller shadows.
Top Tips For Capturing Impressive Drone Videos
Make sure the drone is stable before filming
If there are strong winds, your drone might be wobbling in the sky a bit. Before hitting the record button, make sure the drone is stable and hovering. This should mean less editing later on.
Master Flight Manoeuvres
Flight patterns can make for some unique footage. So before you head out on your first trip, practice flight patterns, such as figure eights and circles to elevate your captures in the field.
Take it a step further and learn how to control your gimbal to pivot your camera midair for those panning and tilting shots.
A classic drone shot to try is focusing on something, and drifting up and back. This creates a cinematic video piece that will impress anyone. And it’s super easy to do.
Top Shots To Try With Your Drone
Still Shots
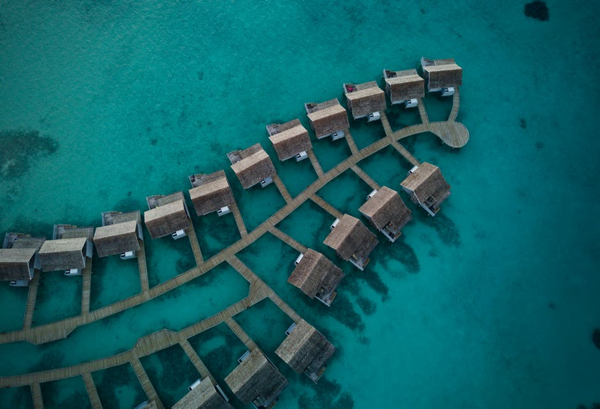
1: Symmetry & Repetition
Order and structure can be spellbinding in their simplicity and often invokes a sense of calm.
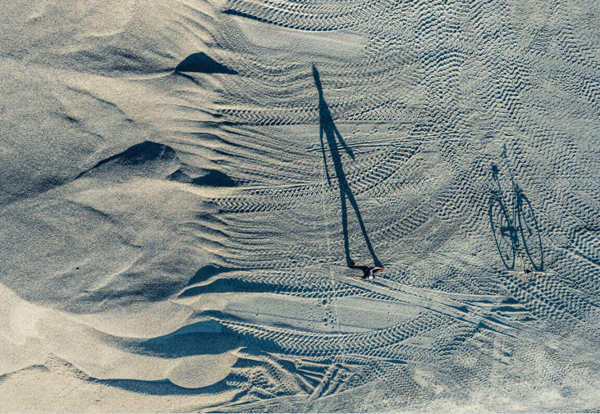
2: Unique Patterns & Abstracts
Things that look humdrum and ordinary from the ground, can turn out to be intriguing from above. You will be amazed by how random shapes and patterns come together.

3: Flipped Perspective
Take advantage of your bird’s-eye view to create optical illusions.

4. Miniature Effect (Tilt-Shift)
Create the illusion of a tiny toy-like world. You may need a bit of a post-production touch to get it just right, but it will be well worth it. These shots never fail to impress and take the viewer back to a childlike, wide-eyed state of amazement.

5. Play with Shadows & Lines
Distinct lines guide the composition of an image, while shadows can provide a point of interest with giant silhouettes that tickle the imagination. In either case, you are making use of these elements to direct your viewer’s eyes to tell a story.
Video Shots
1. The Fly-By
Good for story transitions. As the name suggests, it is achieved by simply flying by or over your subject, often with a pan or tilt of the camera. It helps to give your point of interest some geographical perspective and scale.
2. The High Pan
Ideal for showcasing landscapes and showing the distance between two points. Usually achieved with the drone in a stationary hover, then capturing a sweeping shot by panning the camera in either direction. You can make it a bit more complex by moving the drone forward or backward during the pan for added visual impact.
3. The Reveal
Provides a grand entrance for your subject or point of interest. Starting from an area with your subject out of frame, pan or tilt your camera towards your subject bringing it in the frame. It’s as simple as that. The reveal can be further enhanced by gradually zooming in on the subject.
4. The Chase
Great closing and action shot. This involves following a moving subject at equal or greater speed. We see this used often in movie chase scenes (I guess that’s where the name comes from), as it creates an intense, action packed atmosphere.
5. The Pedestal
Often used when filming tall objects like monuments or skyscrapers. The shot involves filming with the drone moving up and down – not tilting the camera with the gimbal.
These are just a few of the most common drone cinematography techniques. They vary in complexity, so there is something for you to try at any skill level. Just keep practicing and before you know it, you will take your videos to a whole new level.

I live in the UK, in the country’s most uneventful city, where the most interesting story in the local paper is about banning dressing gowns in supermarkets.
I travel and I write, because surely there are more interesting stories than that to write about and share.